Sunday 27 September 2015

Creating a professional signature block with Google docs


Creating a simple yet professional signature block for Gmail can be done and it's doesn't have to be text only.  But how do you create a modern HTML like signature block without knowing coding?  Google Docs of course! Here's some simple tricks so you can make one yourself.

Generally to make a multimedia signature block you would need to know a bit of HTML/CSS or find a program or service that made the creation easy to do, but you have the tools at your finger tips.... for free!

Google docs is an effective application because it can be used on anything as it's a web app and has the familiar user interface of a "word processor" so the learning curve of another app or service is eliminated.

The secret with Google docs is using a table to align all your elements like you would with HTML. Then style with the text formatting tools like you would CSS.  And don't forget this can be done in Microsoft Word but I'm tailoring this to Google Apps users.

The hardest part is getting the sizing and position right, if your like me you want it perfect!  Quick tip: if you find the positioning of things too spread out then reduce the padding in the table properties (remember it's in inches.... C'mon Google bring in the metric system!) and drag your cells in closer.

Also if you need multiple cells the same size then you can set a hard width and height in the table properties too but remember this is a cell by cell property so copy and paste your values.

I have created a guide over at the Shoosh Monkey wiki to show you how and shared the template I used to create my own signature block for you use as a guide or just copy mine!

Monday 13 July 2015

Workflow Max and Google Calendar Integration


OCTOBER 2015 UPDATE:
We have started on version 2.0.  The below features will be included in the next version:
Sync tasks
Syncing tasks with or without syncing Jobs has been a hotly requested feature. This will be the primary focus for phase 2 of this utility.

Multiple staff on a single job/task
One thing that we overlooked until it was too late in the development was assigning multiple staff to a single job or task, d'oh! Currently the utility works great with one person assigned to a job but it became clear that most people assign more than one person to a job or task.  This is priority 2 for this phase.

Iteration through assigned staff to obtain the registered calendar users
Some Workflow Max users had other staff not in their domain assigned to jobs and tasks such contractors or staff that have left but were not deleted. We will iterate through the list of staff and find any that match known registered calendars and assign the job or task to their Google calendar. Any that don't will be skipped.

Hint: you can create an externally shared calendar in your Google Apps domain and assign your contractor to that calendar in the WFM2GCAL setup. This way you don't need to pay for extra user license's in your domain.

Add URL link to job or task in calendar
Self explanatory but we will include the job or task reference URL to the calendar for your convenience.

Other misc sync improvements and bug fixes

AUGUST 2015:
Jobs and Calendar sync is complete! We are finally finished with this part of the utility so please enquire about a demo using the email address at the end of this post.

JULY 2015:
Hello!  It's been a busy month here at SM with so many new activities and projects starting and of course, finishing.  The latest to join the latter category is our Integration utility for Workflow Max jobs and Google Calendar which keeps your staff scheduling in sync and allows your staff to manage their work in a cross-platform tool they are familiar with, Google calendar.

The journey here has been a little tricky which i'll explain shortly but the support team at Workflow Max have been very helpful and our skilled developer has been able to achieve a very elegant and easy to use solution.

First lets start at the schedule for Jobs in Workflow Max (WFM from here on in)

Scheduling is easy with WFM but it requires users to log into the web console to view the scheduled timeline for jobs.  Our utility synchronises the relevant job details with Google Apps for Work staff calendars giving each staff member notifications, visibility and control from their mobile phones using an app that they are familiar with, Google calendar.

The schedule appears in each staff members calendar as an all day event (Only because WFM jobs are not able to be scheduled for different times of the day) and if the event runs over several days then it's created as an easy to read event spanning multiple days.
Updating the event from either WFM or Google Calendar (GCAL from here on in) syncs the changes on a scheduled basis (currently set to 10 mins which is an optimal time to ensure the quota limit is never breached).  We have run this here for a 24hr period syncing over 10 jobs to 3 calendars every 1 minute with very minor Google quota impact (97% of 1 Million calls remaining) and only 3 events on 1 instance had communications failure to the calendar API weshich has never occurred since.

Assigning the job to a particular staff member is also important as we want each staff member to have an easily accessible schedule while in or out of the office.  This is achieved by matching the WFM staff ID with the GCAL ID and then syncing the appropriate data to that staff members GCAL.  This means that notifications are taken care of by the native GCAL app on their respective device, why re-invent the wheel hey?


I might add, all events are viewable by every member of the team if your Google Apps admin has allowed this in the admin console. Otherwise at the very least each member can share their calendar around.

GCAL event title is made up of the important information from WFM including the job number, job name and client (This is easily customisable to suite your business needs). 

Changing the event title from GCAL has been restricted as this should only be controlled via the WFM console so every sync will overwrite the GCAL event title again.

Adding notes for staff members is also handy so we wanted to sync those too.  Changing or adding to the description in both WFM and GCAL syncs these with ease making adding some info a breeze.... I know, I'm sorry for my poor attempt at poetry.  

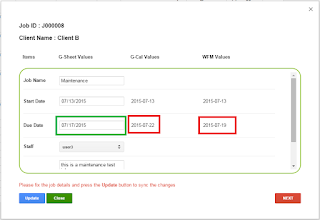
Conflict resolution was a little tricky as WFM doesn't give any time stamps correlating to it's last updateupdate in the API so we have created a very beautiful mechanism for fixing these.  When a conflict has occurred the utility will email the manager (or account that the utility runs under in Google Apps for Work) with a link to the Google Sheet database.  Upon opening the Google Sheet a user interface (UI) displays the conflicting data sets and allows the manager to make changes if necessary and upload to both WFM and GCAL with a single click.  For multiple conflicts the UI will cycle through these until completed.  Then the Sheet can be closed and synchronisation for those data sets will continue.

Need to do some house keeping?  Then remove all your current Jobs from all Calendars via the Workflow Max Setup menu in the sheet.  Neat and tidy.  This comes in handy for when we have some updates and new features and you can wipe your current Jobs and re-sync using the new version.  Soon to come we have built in Calendar Tags so every event that has ever been created by the app can be removed! 

We are very proud of what we have achieved here for our clients that use Workflow Max and Google Apps products and we will continue to enhance these in the near future.  If you would like to get on board we have a special offer on at the moment so head on over to the website and register your interest:


Or if you would like to request a feature please email us at:


Kris 
Chief Monkey
Shoosh Monkey Team
Instagram

Friday 24 April 2015

Unlock your Run with the Android Smart Lock feature


Supported OS: Android 5.0+
Set up complexity: Easy
Instructions link: http://goo.gl/MEEP1k
Requirements: BT paired device you can run with

Tired of unlocking your phone during a run to check your stats, change music or podcasts? Setup Smart Lock with your Bluetooth (BT) heart rate monitor/BT headphones or similar device so when you pair it you're unlocked for your run.  Don't forget to turn the BT device off when you're finished so the phone's security is restored.  I use this with my BT heart rate monitor which works really well, clip it on to the chest strap and it's activated which auto-unlocks my phone, un-clip and it's deactivated and my phones security preferences return to normal (PIN lock).  Give it a go!

Wednesday 22 April 2015

Creating a custom gadget to use 3rd party code in your Google Site


So you want to embed custom code in your Google Site but the security policy from Google disallows it, gives you a warning message similar to the one below:  
Google Sites Code violation warning

A Google Sites Code violation warning which it then rips out the code that makes your button special and you end up with a dinky little hyperlink at best.

In this example I'm going to use the twitter follow button code shown below (I know that there is already a Twitter gadget in the Gadget store but it was easy and people are familiar with how it's supposed to look):

<a href="https://twitter.com/shooshmonkey" class="twitter-follow-button" data-show-count="false">Follow @shooshmonkey</a>
<script>!function(d,s,id){var js,fjs=d.getElementsByTagName(s)[0],p=/^http:/.test(d.location)?'http':'https';if(!d.getElementById(id)){js=d.createElement(s);js.id=id;js.src=p+'://platform.twitter.com/widgets.js';fjs.parentNode.insertBefore(js,fjs);}}(document, 'script', 'twitter-wjs');</script>

So creating a gadget is sometimes the only way to accomplish this, it sounds daunting but after some trial and error I have found the recipe that can be repeated easily over and over again. 

All you need is a text editor like notepad.exe, DriveNotepad or xml.edity.com and this template code: 


<?xml version="1.0" encoding="UTF-8" ?>
<Module>
  <ModulePrefs title="Shoosh Monkey IT Solutions CSE" />
  <Content type="html">
    <![CDATA[
************ PUT CUSTOM CODE HERE ************
 
]]></Content>
</Module>

Then go to the website for the service you want to create a button for, example Twitter is https://about.twitter.com/resources/buttons#follow 

Replace the line of text:

************** PUT CUSTOM CODE HERE ********************

with your HTML code that is needed to embed in your site and add the title of the module where it says:

<ModulePrefs title="Shoosh Monkey IT Solutions CSE" />

So the finished product should look like this (changes highlighted in orange): 


<?xml version="1.0" encoding="UTF-8" ?>
<Module>
  <ModulePrefs title="Twitter follow button" />
  <Content type="html">
    <![CDATA[
<a href="https://twitter.com/shooshmonkey" class="twitter-follow-button" data-show-count="false">Follow @shooshmonkey</a>
<script>!function(d,s,id){var js,fjs=d.getElementsByTagName(s)[0],p=/^http:/.test(d.location)?'http':'https';if(!d.getElementById(id)){js=d.createElement(s);js.id=id;js.src=p+'://platform.twitter.com/widgets.js';fjs.parentNode.insertBefore(js,fjs);}}(document, 'script', 'twitter-wjs');</script> 
]]></Content>
</Module>

Save this as an .XML file format file somewhere online that is publicly accessible as you will need to give the URL for the file location to Google Sites gadget wizard.  I put it on my wiki page in a folder, then right click on the download link and select: 

Copy Link Address 

Then go to your site, in the place you want to have your gadget, click Insert > More Gadgets > Insert Gadget from URL > paste the copied file public URL into the address field. 

You will be given options for the size of the gadget so this will need a little fiddling depending on the size of your button etc, as the Gadget area will push text down the page leaving lots of negative space around it which will look silly. 

Also get rid of the display title etc. and voila!
Set your width and height and remove the title etc..


You have a proper button using a custom Gadget! 


I hope this helps. Buzz me if you need any help with this or leave a comment. Cheers.

Thursday 16 April 2015

SPAM and how to deal with it

spam and how to deal with it


Getting SPAM email is annoying and sometimes scary to deal with for some people as it can be targeted to you without any familiar identity or known origin. 

What is SPAM? Well to recite the Australian Communications and Media Authority (ACMA) it’s:

"the common term for electronic ‘junk mail’—unwanted messages sent to your email account or mobile phone."

I would even go to say rather than unwanted it’s unsolicited email as when you sign up to some services you are acknowledging that they will send you emails unless you explicitly advise otherwise usually with unchecking an option on signup.  It is required that the genuine commercial emails contain an unsubscribe link or method but be careful as the SPAM'ers do this too and the link is the same as dangerous link promoted elsewhere in the email.  Good rule of thumb, if you don’t recognise all of these items:

  1. the sender
  2. the sender address; and
  3. the domain it’s from

THEN DON’T CLICK ON ANYTHING!

NOTE: The domain must match the senders email address so if the email looks like it's from your friend but the unsubscribe link is for a different domain then your friends email has been spoofed, for example:
The email is from your friend Joe and his email is joe@mysite.com.
The link will be something like http://unsubscribe.mysite.com or www.mysite.com/unsubscribe or a similar variant.  The important part is the domain which is the mysite.com, if it’s www.mysite.it.com then it could be a faked URL and NOT your friend Joes site.

But don’t fear, if you think that this is a targeted or unsolicited SPAM message you can forward this onto the Australian Communications and Media Authority spam-bot to investigate.  Just forward the email without any additions or editing to:


Then delete the message immediately. The ACMA will send you a confirmation email and if required may contact you regarding this but please be careful about any personal information that you give ANYONE that contacts you that you didn't request to do so.  More information can be found here:


I hope this helps and please, if you are in doubt feel free to contact me with any questions before you do anything with it.

Tuesday 17 March 2015

Automating Outlook

automating microsofts outlook

Microsoft Outlook as a great array of automation features out of the box, but for those that need a little extra or like to "tinker" then there is always the "roll your own" method..... using custom scripts.

Yes I know, I do prefer Google Apps products but there is no denying the power of Outlook and many people still use this client as the front end of their Gmail accounts.  

I have used Outlook for many years as my primary front end to email until about 4 years ago when I went completely online.  So I know the product fairly well and have always used it's better known features like Rules and dabbled in its lesser known features such as VBA script.  I will be aggregating the automation goodies I find on the web and some that I used at home and work when I used to use Outlook.

Friday 6 March 2015

Google Docs vs Microsoft Word - it's not as hard as you think to change over

Microsoft Word vs Google Docs

Editing a document with Google Docs is different but it's not hard.  With unmatched features like always online, accessible from any device and super easy collaboration then its Google Docs that gets my vote.

Most of the controls and formatting options are the same as other word processors albeit a little lighter in choice. The level of functionality and visual appeal most people are accustomed to with MS Word is achievable if you can lend a little extra time to figuring it out.

I'll be highlighting some of the differences between the two of the major players (Google Docs and MS Word) and demonstrating just how to achieve a visually appealing document in Google Docs that is comparable to its competitors.

First up (just because some people have been struggling with it) is the difference between editing, commenting and viewing a document in Google Docs.  It might sound like it's pretty self explanatory but when you are used to the Microsoft way it can be a little strange at first, a new tool and a new way of doing things sometimes puts people off learning.  

But once you see how easy it really is then you'll wonder how you ever used anything else.